Do you want to know how to start a WordPress blog with Bluehost? It’s easier than you think!
I started my own blog (Kat and Blossom) in 2019, so I’ve learned a lot and had my own ups and downs getting everything set up and running.
If your business goal is to run a blog full-time and become a successful blogger, Bluehost is the best option that I’d recommend to you, especially for beginners looking to blog with WordPress.
It’s super simple to get set up and get your WordPress blog up and running fast.

- Why Use Bluehost To Start A WordPress Blog?
- Don’t Forget Your Email Marketing Plan!
- See How To Start A WordPress Blog With Bluehost
- Step 1: Choose a Host for Your Blog
- Step 2: Choose Your Preferred Plan
- Step 3: Set Up Your Domain
- Step 4: Fill Out Your Account Info
- Step 5: Put In Your Payment Info
- Step 6: Pick Your Package Options
- Step 7: Create A Password
- Step 8: Go To The Login Page
- Step 9: Log in to Bluehost
- Step 10: Create Your New Blog
- Step 11: Choose Your Blog’s Main Goal(s)
- Step 12: Pick Your WordPress Theme
- Step 13: Get To Know Bluehost
- Step 14: Go To Your WordPress Dashboard
Why Use Bluehost To Start A WordPress Blog?
Bluehost has 24/7 support, a money-back guarantee, and makes it as easy as it can possibly be to start your blog right now. It’s super convenient to be able to set everything up in one go and get a free domain name all in one go.
Blogging may be your ticket to working from home, traveling whenever and wherever you want (all you need is a computer and internet connection), and be able to flex your schedule as you need to.
Truly anyone can make money with a blog, and you’ll be able to start monetizing your blog quickly once you focus on your niche and start writing content. Affiliate marketing is probably the most beginner-friendly way to start making money with your blog and new bloggers can get signed up with platforms like ShareASale.
It’s a misconception that you have to be a well-educated trained writer to be any kind of blogger also. And actually, people prefer to read blogs on a third-grade level. I was amazed when I heard this, but it’s true! You just need to write basic, simple content that’s easy to understand and figure out how you can HELP people in your niche. Then, grow your audience and your business.
It’s certainly not a get-rich-quick scheme (I’m a firm believer that there is no such thing unless it’s pure luck or dishonest!) or anything like that. But, with hard work and CONSISTENCY (the key), you can gain a following and grow your business quickly.
Don’t Forget Your Email Marketing Plan!
On a side note, having an email marketing plan is a crucial step in growing and maintaining an audience, especially when you have an announcement or a new product you want to tell them about. After you put the hard work into creating your content and your opt-in freebie, you don’t want to miss out on the chance of getting them on your email list so that they’ll stay with you and become a long-time follower.
I use FloDesk which I love. If you’re looking for a feminine and attractive way to create emails (you can customize the style if you have a more masculine/neutral brand though), FloDesk is the way to go. I have used other platforms that were just too techy, not pretty, or hard to understand. But, FloDesk is very easy to use and you can use their beautifully designed pre-made templates. Just customize your fonts, colors, and content and you are good to go!
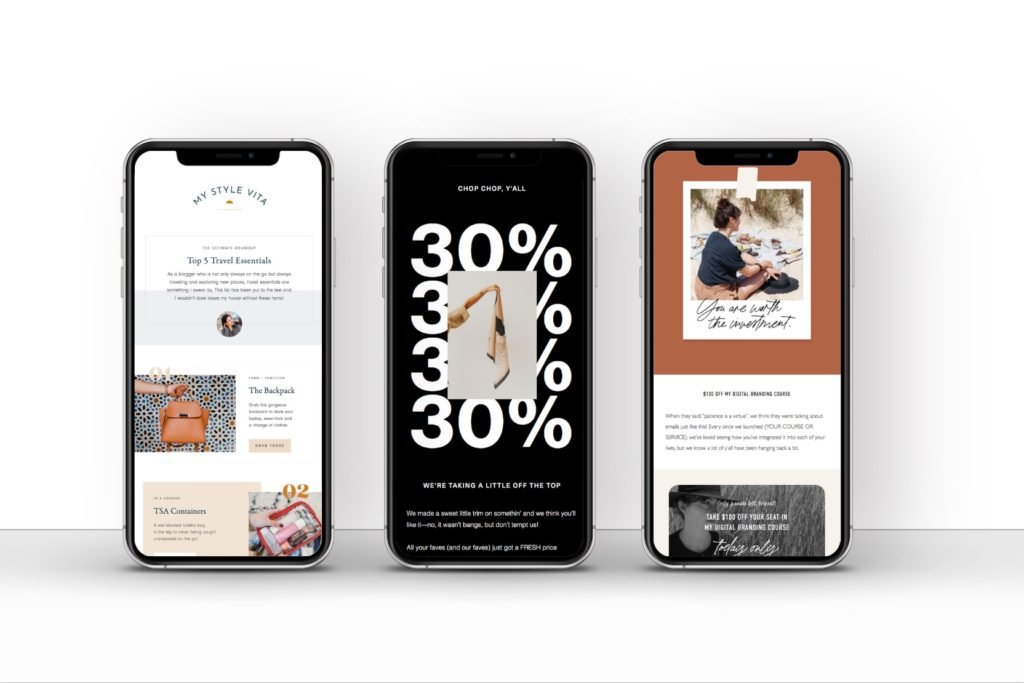
You’ll be able to make emails like these with ease:

Get 50% off your FloDesk subscription here.
We’ll talk more about monetizing your blog, affiliate marketing, and even selling your own digital products later.
For now, let’s just get started by creating your site and domain name (aka your business blog name).
If you want the best deal, choosing the 36-month plan will give you the lowest rate per month and is the best option in the long run if you’re serious about running your blog. You’ll find my special discounted link below and in Step 1.
Ready to start your blog? Here are the steps.
See How To Start A WordPress Blog With Bluehost
Disclosure: I am an affiliate for Bluehost and FloDesk, and I will receive a commission if you sign up through my referral link. This is at no additional cost to you. You’ll get great pricing, customer support, and also with Bluehost, a free domain name through my link.
Step 1: Choose a Host for Your Blog

Finding a trustworthy host with good customer support is an essential part of running a blog smoothly.
I started out with Bluehost and they are who I still use. They are very beginner-friendly and budget-friendly.
They’ve been around since 2003, and they currently have over 2 million customers worldwide.
Whenever I’ve had an issue or question, their customer support has been fast and efficient and so far, I haven’t had any unresolved issues. And they make it really easy to get in touch and talk to them through their online chat (which, I personally love since it’s easier).
What Do You Get With Bluehost?
- Free Domain for Your First Year
- Free Secured SSL Certificate (this means that your site will be authenticated and go from “http://www.yourdomain.com” to “https://www.yourdomain.com,” making it more secure)
- 1-Click WordPress Install
- 24/7 Customer Support

So, the first thing you’ll want to do is go to their homepage.
Click here to get my special discount of $2.95/month.
And click on the button on the left side that says “Get Started.”
Step 2: Choose Your Preferred Plan
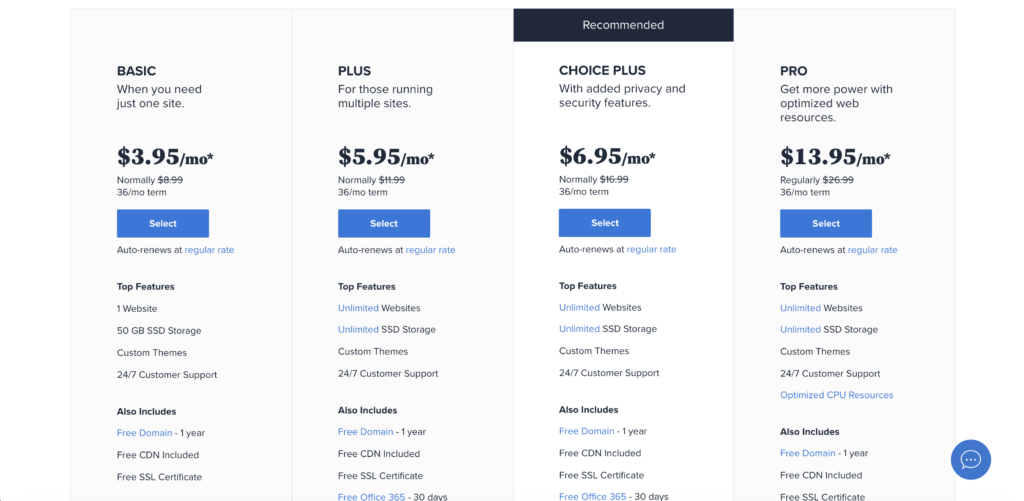
Select the Basic Plan. This is really all you need unless you need multiple sites later or more additions when you have grown your business.
Don’t forget, when you use my link from Step 1,
you’ll get $2.95/month instead of $3.95/month,
so you definitely don’t want to miss out on that offer.
Step 3: Set Up Your Domain
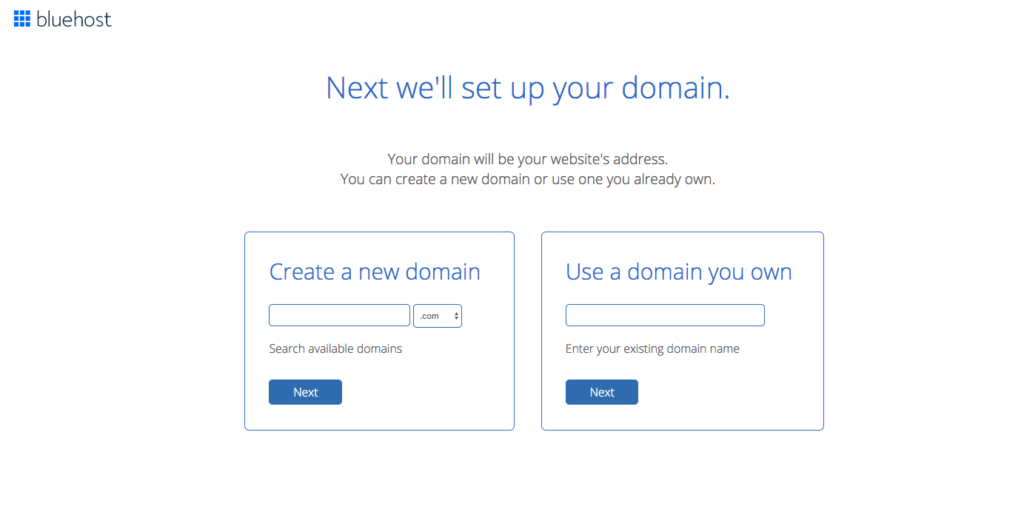
You’ll need a domain name, which is a digital address (usually the name of your blog) where your blog’s home will be. Like mine is katandblossom.com. It can be your own name for personal branding or tailored to whichever kind of blog you want to start, i.e., a travel blog, service-based blog, food blog, etc.
Whatever you choose, you’ll want something that’s easy to pronounce, easy to read, and not too long. Think about how it will tie into your branding and relate to the kinds of things you’ll blog about.
I like using the Namelix free generator to help me come up with ideas. You just type in the keywords you want, pick what type of name you want, and how long you want it to be, and it will generate some names for you with color ideas and fonts.
Like, if I want to start a cat care blog, and I type in the keywords “cats, meow, care” it comes up with this:
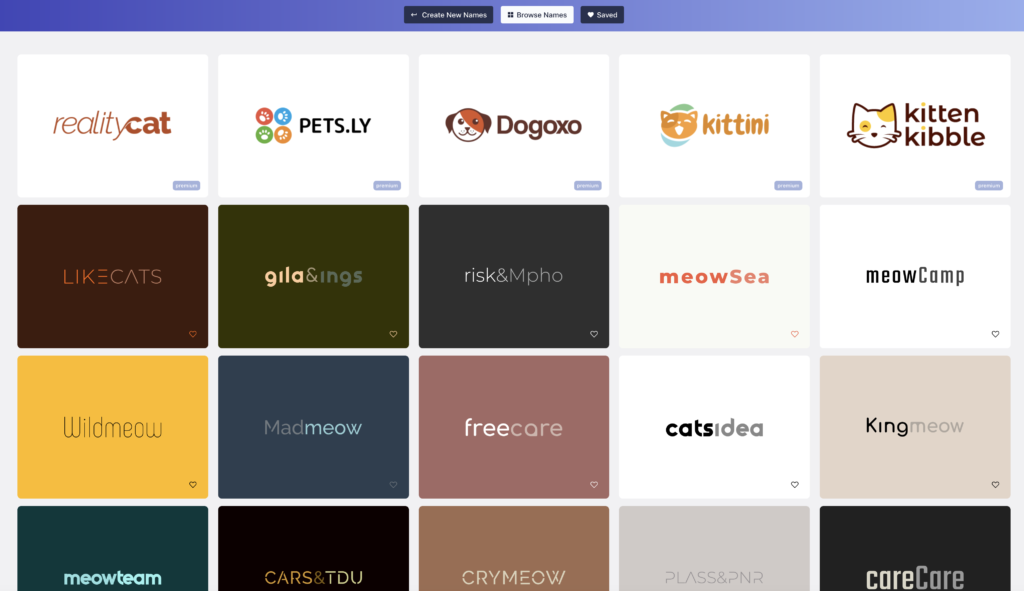
The “Kittini” one is pretty cute!
It’s not perfect but it at least gives you a base to work with, and then you might get some ideas of your own to add to one of the words Namelix has chosen.
So, after you’ve brainstormed and decided on which domain name you want, just type it in the box shown above. If it’s not available, choose another one. If you already have an existing domain name, you can also enter it.
Once you’ve got your domain name, click the blue button that says “Next.”
Step 4: Fill Out Your Account Info
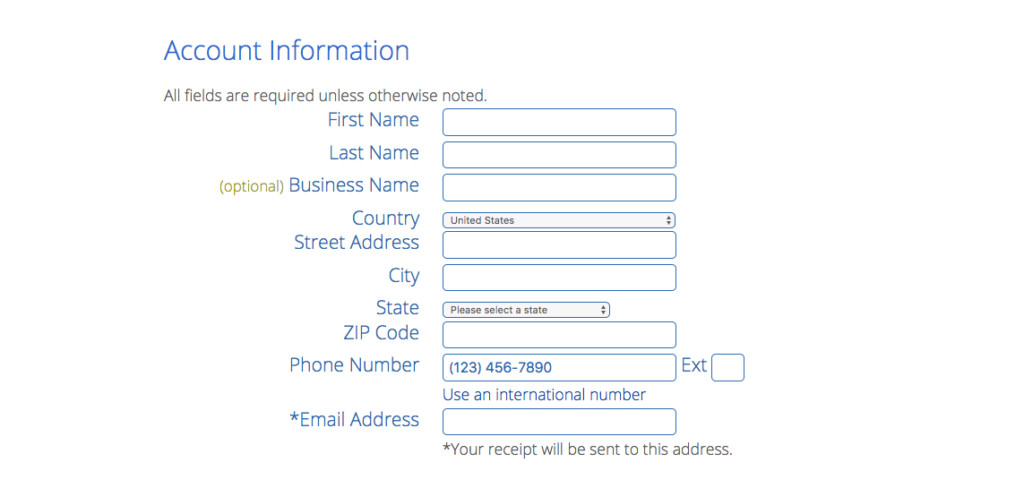
Fill out your information to set up your account.
Step 5: Put In Your Payment Info
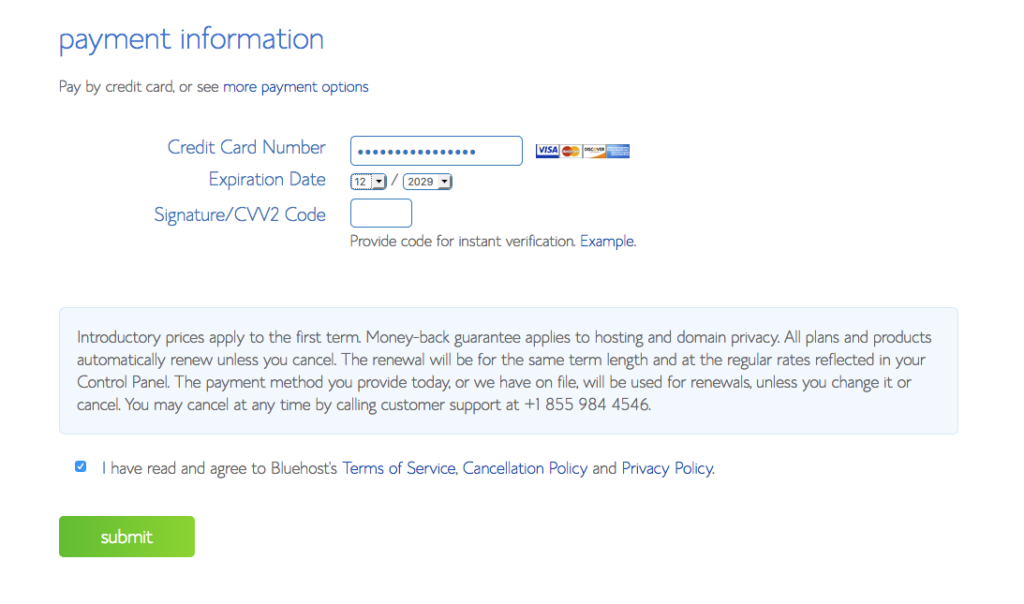
Enter your card number, expiration date, and CVV2 code. Make sure you have read Bluehost’s terms and policies, and click the checkmark box.
Click the green “submit” button.
Step 6: Pick Your Package Options
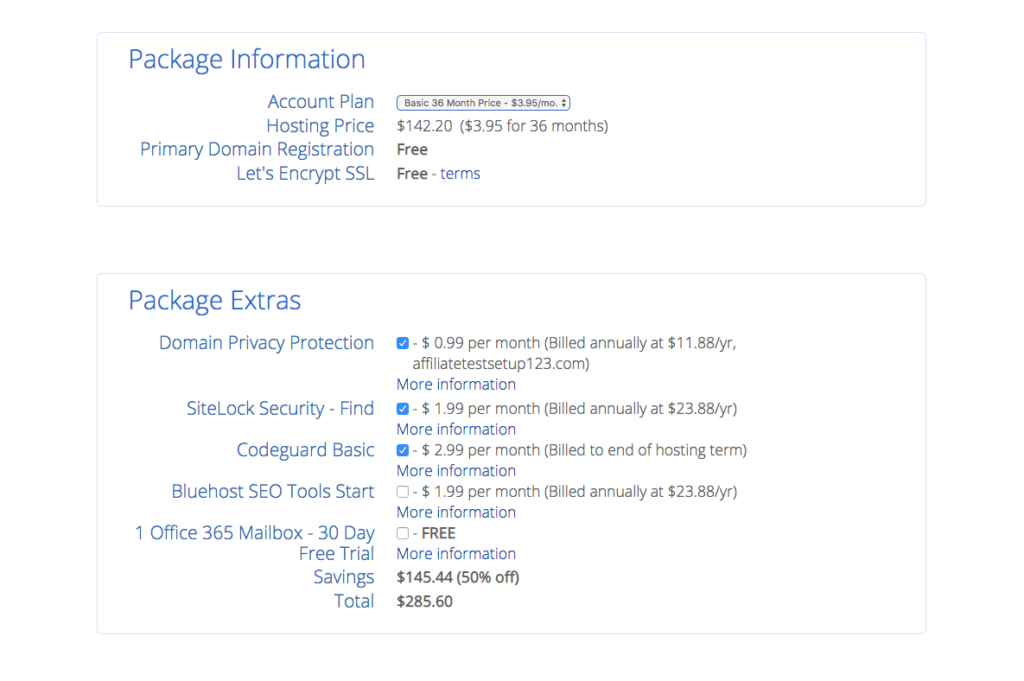
Now, you’ll be taken to the package section.
Choose your Account Plan by clicking the dropdown menu and choose “Basic 36 Month Price – $2.95/month.”
You’ll then see “Package Extras” to choose from.
I’d recommend the Domain Privacy Protection and SiteLock Security.
Domain Privacy will help prevent spamming and exposure of your personal information that’s connected to your domain and its registered owners. It’ll stop the abuse of email addresses and other publicly available WHOIS data.
SiteLock Security also protects against spammers and hackers, but on your whole site. It’s a tool that monitors and scans your website’s security daily. Read more about SiteLock HERE.
If you think you need more or less than that, you can always choose what you need or update your extras later.
Click the checkmark box(es) of what you need then you can move on to the next step.
Step 7: Create A Password
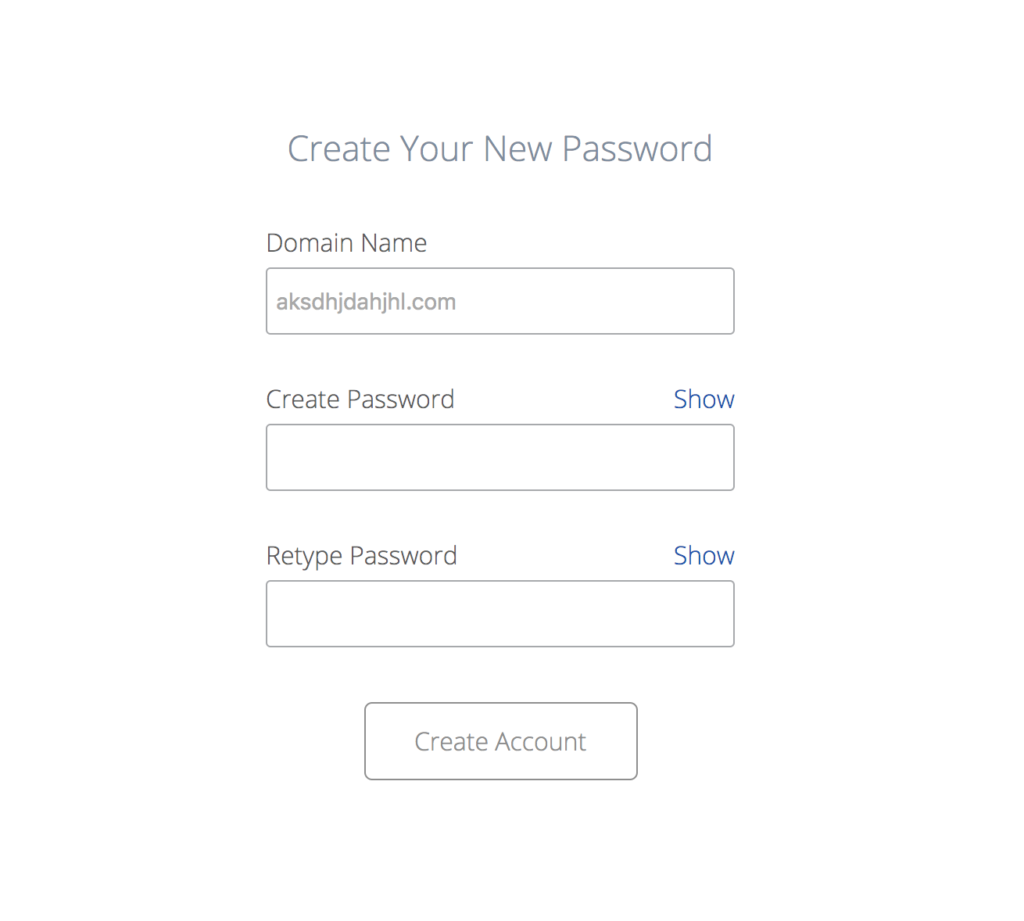
Now, just enter your domain name you chose (yourdomain.com), create a password, and click “Create Account.”
Step 8: Go To The Login Page
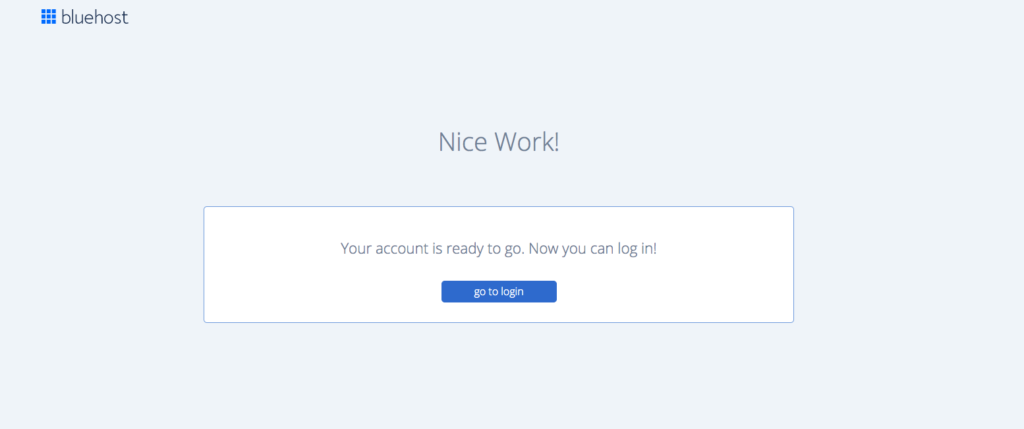
Now, you’ve got your account setup and you can login!
Click “go to login.”
Step 9: Log in to Bluehost
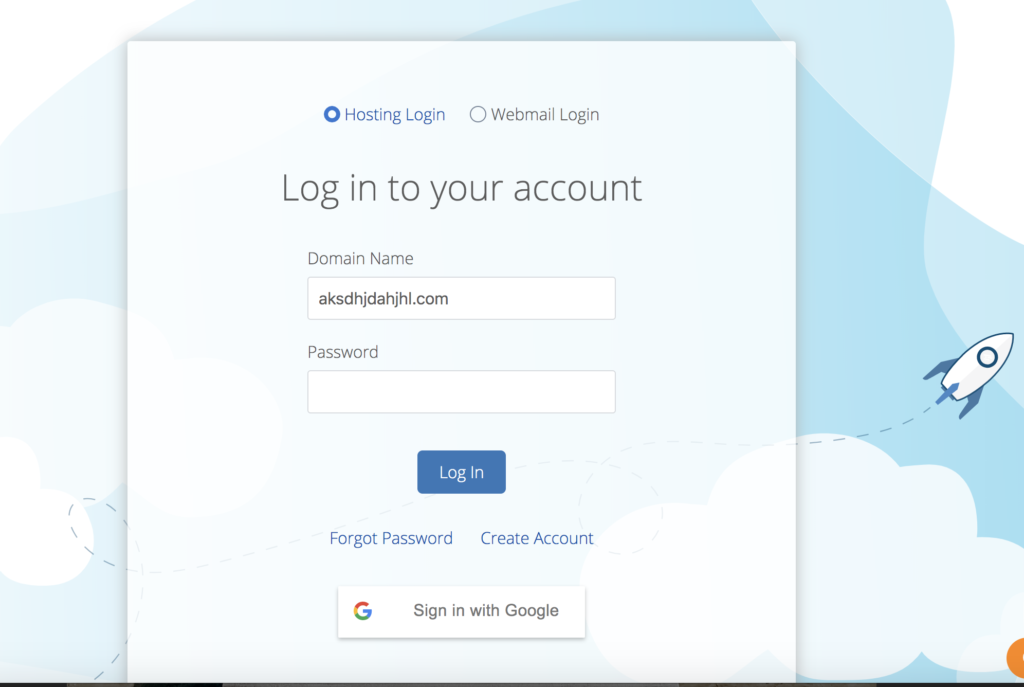
Type in your new domain name and password that you created.
Click “Log in.”
Step 10: Create Your New Blog
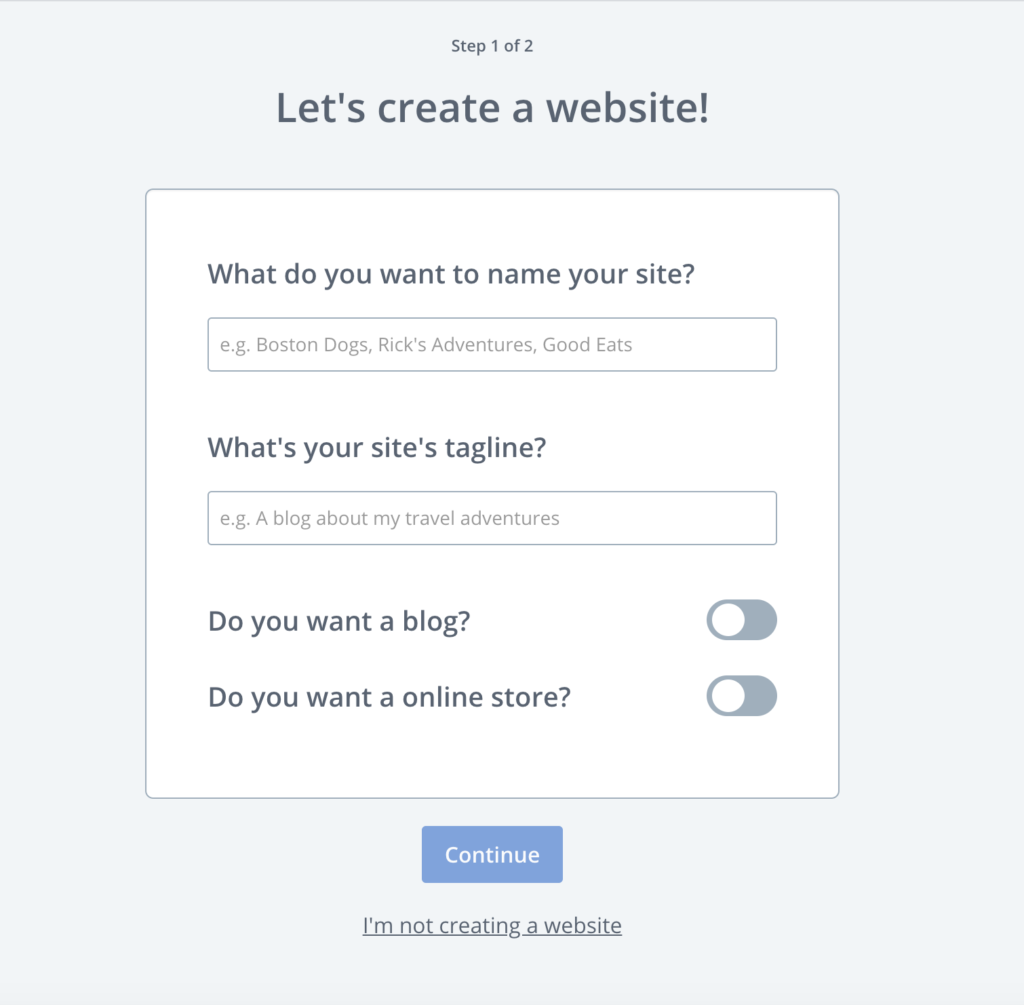
Now, you need to give your site a title that’s related to what you do like the examples given above.
The title should be what your site overall is about and what you primarily aim to write about.
The tagline is a quick way to describe your blog.
It’s important, especially for new visitors, to see a quick reference so they can get an idea of what to expect when visiting your blog. And that way you’ll attract your specific target audience.
Both of these help to improve your site’s SEO as well.
You can always change it later, so you don’t have to worry over it too much.
Then you’ll have options to choose whether you are starting a blog or online store. In our case, it’s a blog, so just click on the circle to turn on that you want a blog.
Click “Continue.”
Step 11: Choose Your Blog’s Main Goal(s)
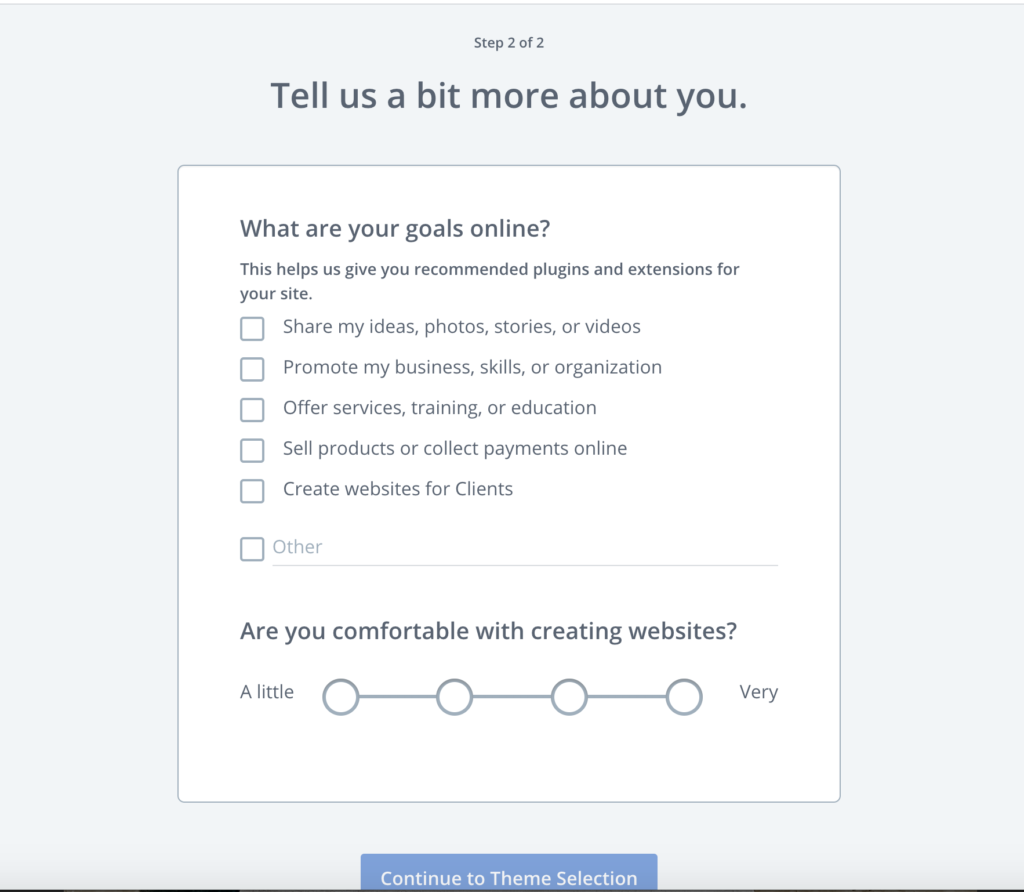
A few more questions to answer.
Click to checkmark what your goals are with your blog and choose a circle below that about your experience with creating websites from ‘a little’ to ‘very.’
After you have finished that, click “Continue to Theme Selection.”
Now, onto my favorite part, picking a theme!
Step 12: Pick Your WordPress Theme
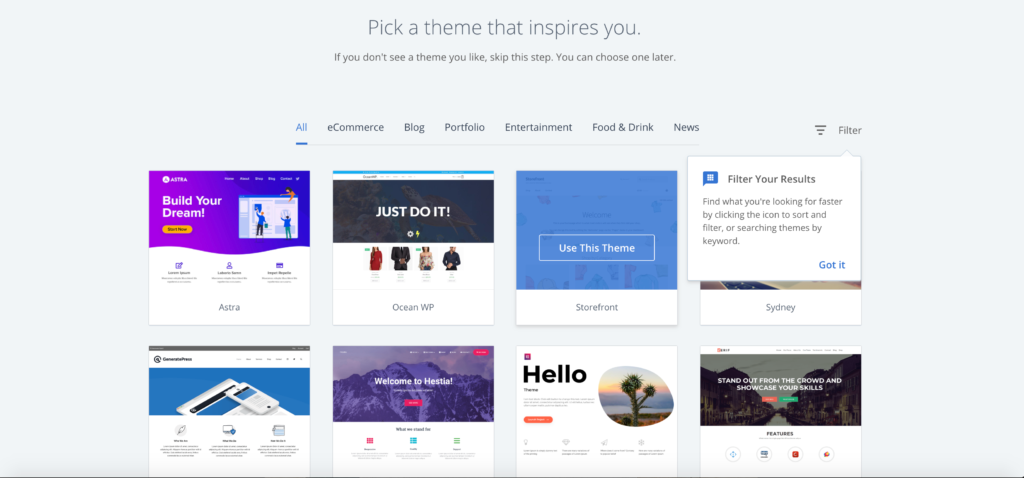
Your theme will be the design and look of your website when someone visits your blog.
There will be free options and others that you’ll have to pay an additional fee for.
You can search “Blog” by clicking on the blog section to find a theme you like.
I started out with a WordPress theme but now I have a more customized one that was created by a blog designer company. Later on, I plan to hire a professional website designer/developer to customize it even further.
But when you’re just starting out or if you are new to blogging and websites in general, then a simple WordPress design will do. And you can customize the colors, fonts, pictures, and content to fit your brand’s style or ‘brand voice.’
Step 13: Get To Know Bluehost
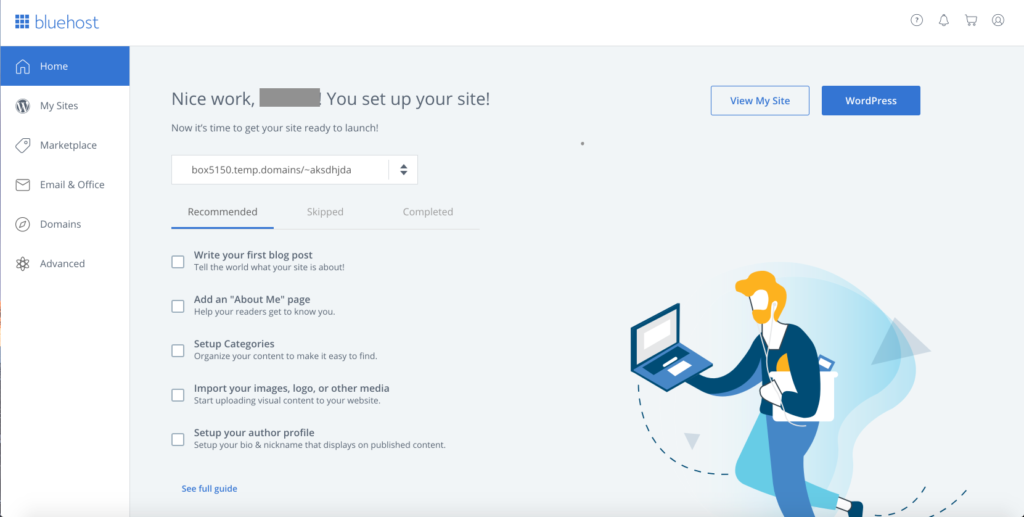
Now you’re set up with Bluehost! You’ll see your Bluehost dashboard. This is where all of your account and plan information will be, along with your domain settings, and overall site management.
To go to your WordPress dashboard, click on “My Sites.” And you’ll see your domain name. Then, click on “Manage Site.”
Check Step 14 on what to do next.
Step 14: Go To Your WordPress Dashboard
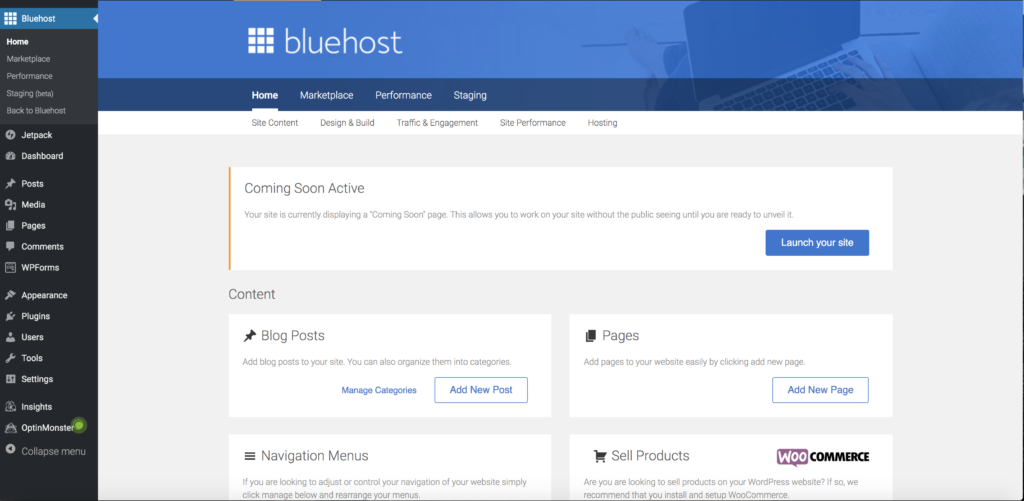
That’s it!
You’ll be taken to your WordPress dashboard as shown above.
This is where you’ll set up your pages, write your blog posts, customize your theme, add your plugins, and more.
If you have any questions at all, the Bluehost support team can help you out. You can contact them through your Bluehost dashboard as you saw in Step 14. Shoot me an email anytime HERE as well if you get confused and I’ll do my best to help you out.
If you liked this post, don’t forget to pin it in case you need to refer back to it. Feel free to follow me on Pinterest or my blog.
Stay tuned for more blogging tips coming your way!
